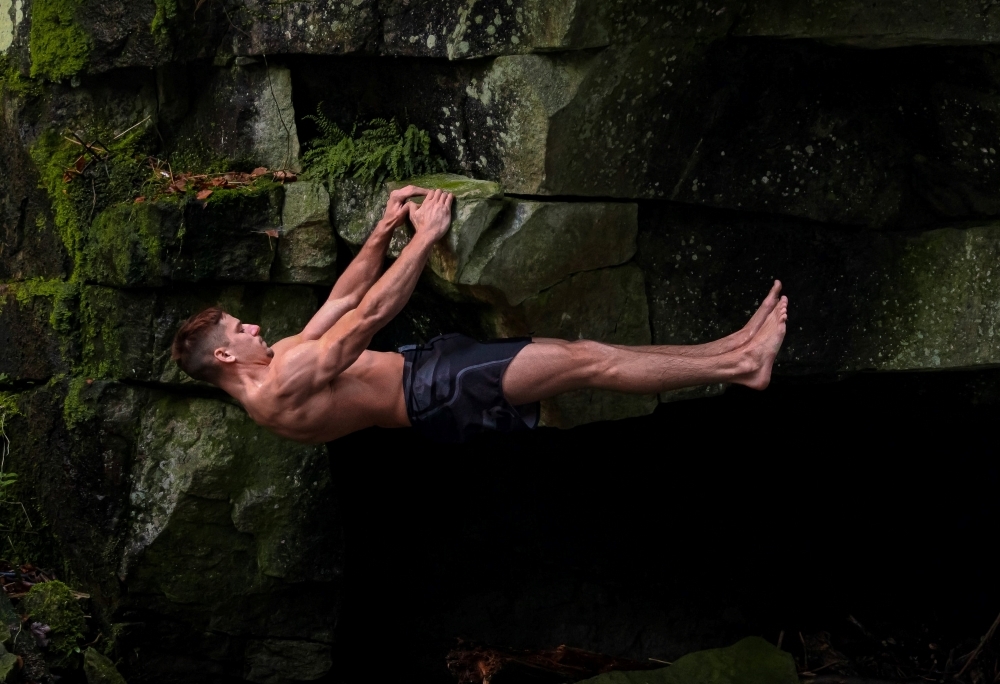
What is the front lever?
The front lever is a static strength skill, that involves holding your body completely straight and horizontally only with your hands touching the bar.It is similar to the back lever.
Front lever derived from gymnastics where it’s considered one of the easiest moves – it’s rated as an A on a scale of A – F, with F being the most difficult. But in calisthenics, it’s considered an intermediate-level skill
starting position
Let’s start by discussing how we can get into the front lever position.
There are many ways how to get into that position, but the 3 main and most common are; negative, raising, and straightening the leg we are supporting ourselves with when we already are in a horizontal position on the low bar.
The easiest one is with leg assistance. This way you don’t waste strength to get into position, therefore you have more strength for the actual training – front lever hold will be longer and more efficient. This method is the best if you’re just starting with the front lever or if you’re going for the personal record.
Negative consists of lowering your legs down from the position by touching the bar – all in front lever position with a straight body. Negatives require some strength, more than the previous method but not that much, that it will significantly affect your hold time.
Raising the front lever is even more challenging than the negatives. It’s a great exercise to work on the front lever but not as a way to that position. If you can barely hold a front lever, then don’t use them as a way of getting into that horizontal position. They will significantly affect your hold time, your training will be less efficient, and therefore progress will be slower.
For some people, the difference between the method of getting into the position is so significant that they even questioned the world record for the longest front lever hold because it was done on the low bar.
Front lever Proper form
Proper form is the most important aspect while learning any calisthenics skill. By starting to learn with the correct form you will get better results. When the movement is performed correctly you will progress faster, it will be easier and that can help you prevent injury.
Scapula retraction
I often hear people advising full scapula retraction, but that is almost impossible to do even for the top athletes.
Scapula retraction is important, but don’t try to fully retract your scapula because it will lead to destabilization of the rest of the position and it will be hard to generate enough power from your core muscles to hold that straight line.
Even with the retracted scapula your shoulders will be slightly extended forward. Don’t worry about it, it’s as it should be. That is due to the specificity of the shoulder joint and so-called scapulohumeral rhythm.
So retract your scapula but not fully because that’s almost impossible and it will only limit your progress if you focus on that too much. There are more equally important things to work on, so don’t waste your time and energy on something you won’t achieve anyway.
Straight arms
Ideally, the elbows should be fully extended.
But if you’re just starting with the front lever and even the easiest progressions are hard for you to hold with straight arms, you can do them with elbows slightly bent, that’s not a big deal. With bent elbows, you generate more power from your biceps instead of the upper back (mainly lats) as it should be. That makes the exercises easier.
It’s best if you can train from the very beginning with straight arms, not because you will progress faster – you can faster achieve front lever with a bent arm but after that, you have to improve your technique, but training from the beginning with straight arms takes longer, so the time needed is the same. The important thing is, that if you train from the beginning with straight arms you build good habits.
If you’re not able to keep your arms straight right now, just remember to work on that and slowly straighten your elbows more and more from training to training.
Bend the bar
Straighten your arm in front of you, tighten your fist and extend the thumb. When you’re in the position with hands shoulder-width apart with thumbs facing each other rotate your arms so that thumbs are facing upwards.
That’s the movement you want to do while doing the front lever as if you want to “bend the bar”. With this, you will generate more strength from your arms and shoulders.
Pelvic tilt
That is another thing that is often overlooked when talking about the front lever.
Regarding Pelvic tilt position during the front lever, most of the experts recommend P.P.T. (Posterior Pelvic Tilt) but there are also a few who lean towards a neutral pelvic position. I didn’t hear anyone recommend A.P.T. (Anterior Pelvic Tilt).
I also think that we should have a slight P.P.T during the front lever. We should aim more toward the hollow body position rather than the arched back position.
Engage the whole body.
Although the front lever is mostly about upper back and core strength it’s a full-body movement. It involves your whole body, so don’t forget about that.
To maximize your front lever training, engage every muscle you can. From glutes and quads that will help with pelvic stabilization up to the neck and toes that will help to generate even greater tension in the whole body, which will translate into increased strength
In summary:
- Scapula slightly retracted and depressed
- Shoulders slightly protracted
- Straight arms – elbows fully extended
- Bend the bar
- Posterior Pelvic Tilt – hollow body position
- Engage your whole body
Muscles worked during the front lever
It’s important to know the main muscles involved in the front lever to better understand the movement and to know what to focus on while training for it.
As I already mentioned most involved are upper body muscles – mainly lats and triceps and also core muscles – rectus abdominis, internal and external oblique. And many other muscles to a lesser degree.
Front lever Progressions
As in most calisthenics skills, we have 6 main progressions, which are:
tuck
advanced tuck
straddle
half lay
one leg
full
And the front lever is not different.
The goal of progressing in the front lever is to straighten your legs more and more each training until you’re completely horizontal and straight.
Basically, there’s an infinite number of “progressions”. Every detail, even an inch difference in how your leg is extended can be treated as a different progression.
So, remember that these 6 are the main points of reference and you don’t necessarily have to hold one progression for x time to go to the next one. Because there are so many options between.
Tuck front lever
In tuck only the back is horizontal and knees are drawn to the chest as much as possible.
Advanced tuck front lever
The next one is advanced tuck where the hip angle – between the torso and tights is about 90 degrees. With the legs extended forward, the center of gravity changes, and with that level of difficulty.
Straddle front lever
In straddle, the legs are completely straight but as wide apart as possible.
Half lay front lever
The next one is a half lay, in which we hold our body almost completely straight with the fact that our legs are bent at the knees and fall down
One leg front lever
One leg involves holding the front lever with one leg straight and the other close to the chest as in a tuck.
Main exercises
These are the 3 main exercises with the use of the progressions above to improve your front lever.
Front lever Hold
The first and most obvious way to improve your front lever is static, isometric hold. That’s the best exercise to train with for the front lever. It can be done with any of the progressions and with the assistance of the resistance band.
But don’t just rely on holds, add also 2 other exercises, because otherwise, you will be strong only within 10-15 degrees from that completely horizontal line. And at some point, you will hit a plateau
Front lever Negatives
The next are negatives – eccentric exercises consisting of lowering your legs down from the top position with legs touching the bar – all in front lever position with a completely straight body.
Front lever Raises
The last one is front lever raises – these are basically reverse negatives. You start in the dead hang and raise your body throughout the entire range of motion of the front lever.
Front lever raises are easy to cheat with, beginners tend to perform them with momentum (kipping) and bending their elbows. Then the exercise is useless.
The most important with is technique – slow and controlled movement without rushing. If you have difficulties with that exercise just pick easier progression.
Accessory exercises
Scapular pull ups
Scapular pull ups are great exercise, especially for beginners to teach them how to properly retract their scapula and build the necessary strength for the front lever.
Weighted pull ups
Weighted pull ups have a huge impact on the front lever.
According to this video, where the survey was conducted, 60% of people (24 out of 41) with ORM 65-80% bodyweight can hold the full front lever, and it’s even 80% (15 out of 19) of people with ORM more than 90%.
As you can see, it’s worth doing weighted pull ups to improve your front lever.
Hollow body
In the hollow body position, we can simulate the front lever hold by stretching our arms up and straight. It will get us used to that position (in particular pelvis position) and also build up core strength
If you have a resistance band, then there’s an even better option for you. Do the exercise above with the band attached to something behind you. You can do that as an isometric exercise – static hold, or for reps – that’s called banded hollow lat pulldowns.
Dragon flag
Another great way to work on the front lever is a dragon flag. It involves exactly the same muscles as the front lever – core and lats. That exercise is a little more advanced and you might not be able to perform it at the very beginning.
Conclusion
The front lever is an element that, first of all, requires time, and thus patience. Remember to properly prepare for learning this element and realistically assess your level of advancement, so as not to throw yourself into the deep water and try to make more difficult progression than you are able to do. Consider your health.
The key to achieving this goal is, above all, the accuracy of the exercises performed in order to properly engage the necessary muscle parts. So if you have chosen the front lever as your goal, give yourself time. Do not rush and do everything diligently and regularly.