An Elbow lever is a basic calisthenics skill that every athlete should be able to do. It’s essential to master the elbow lever to unlock other skills like the front lever and back lever. In this article, you will learn what an elbow lever is, its progressions, and its proper form
What is an elbow lever?
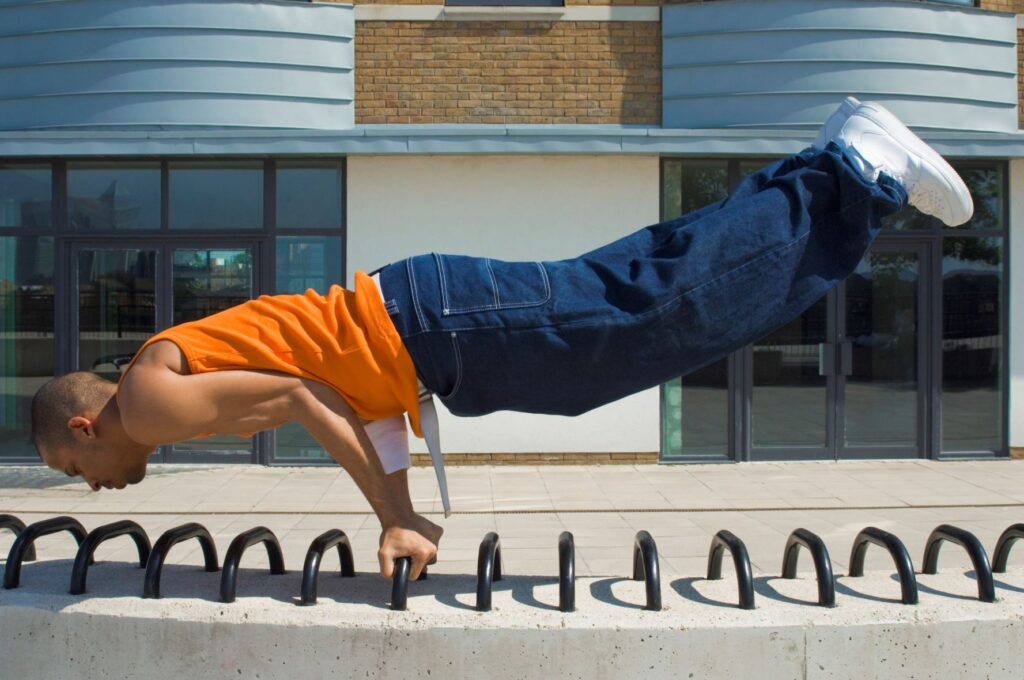
An Elbow lever is one of the easiest calisthenics skills. It’s a great exercise for beginners to learn how to engage their full body in the horizontal position, which will help later with the front and back lever. It consists of holding a body horizontally, parallel to the ground, and only on your hands by resting the torso on your elbows.
Although the Elbow lever and bent arm planche look very similar, these are different exercises. In the elbow lever, your torso is located on your arms so that you support yourself by putting weight on your elbows. In bent arm planche elbows are next to our torso, therefore there’s much more pressure on the shoulders, which makes the exercise much more difficult.
Proper Form
It’s important to understand proper form before attempting the move
Hand position
The hand should be close to each other, under your torso, and facing the sides
Elbow position
Elbows should be positioned at the level of the belly button and halfway between the belly button and the edge of the torso. If your elbows slip to the sides during the movement, position them closer to your belly button.
Muscles worked during the elbow lever
The elbow lever works most of the major muscles in our body
The primary muscles worked in the elbow lever are:
- deltoids
- triceps brachii
- triceps brachii
- rhomboids
- trapezius
- upper pecs
Additional secondary muscles worked include:
- latissimus dorsi
- core muscles
- glutes
Progressions
3 progression to help you master the elbow lever.
Tuck elbow lever
Bent your legs and bring your knees close to the forearms.
Straddle elbow lever
As in front lever and many other calisthenics skills, we can use straddle progression. With the legs straddled the exercise will be much easier.
Band assisted elbow lever
Attach the resistance band to the pull up bar or something above you and during the exercise keeps it on your waist. With the assistance of the resistance band, exercise requires significantly less strength.
You can even combine band with the other progressions – for example straddle and band if you’re not able to do straddle yet.
Variations
If you’ve already mastered the frog stand, you might want to try these more advanced variations
Elbow lever with different grip
To make this move harder try with different grips, like fist elbow lever or fingers elbow lever
One arm elbow lever
After you fully master 2 arm elbow lever, you can begin to train one arm variation. Start in the same position as in two arm elbow lever, however before taking your feet off the ground, shift your weight over to one side and position that elbow as close to your midline as possible. You can progress the same way, tuck → straddle → full
Bent arm planche
As I already mentioned, a bent arm planche is basically an elbow lever with elbows wider apart. It’s a harder version of the elbow lever and a great skill to learn next.
Tips
Few tips to make it easier for you to learn the frog stand
Wrists mobility
Hand position is the most important thing in the elbow lever. If you don’t have enough wrist mobility it can limit your elbow lever progress. Here’s a great follow along routine to increase wrist mobility and strength.
Warm up
Remember to always warm up before training, to prevent injuries.
Record yourself
Record yourself and watch back to monitor your form. By watching the video you can see exactly from the side what your form looks like and what else needs to be improved
